A few weeks ago I was tasked with troubleshooting an issue that a firm was experiencing with its newly imaged Windows 10 workstations. Upon every reboot, the workstation would prompt for the Bitlocker Recovery Key. Anyone familiar with Bitlocker knows what a pain it is to have to enter the 48-digit recovery key once, let alone every time a machine is restarted.
The client was deploying the image to a variety of Dell hardware, using TPM 2.0 and running in Legacy Boot mode.
Preliminary troubleshooting steps such as applying the latest BIOS/Firmware updates, clearing the TPM, and checking if there were any USB type-C or Thunderbolt 3 ports proved unsuccessful.
Upon digging a little deeper I found that in the TPM administration console the status of the TPM was “The TPM is ready for use, with reduced functionality.” This led me to believe that the issue was that the newer hardware was running in BIOS mode with an MBR drive instead of UEFI with a GPT. Creating a new image was out of the question and it turns out the imaging tool used did not support UEFI configurations.
Luckily the client was deploying the 1703 build of Windows 10. In this version, Microsoft released a new tool that was perfect for our situation, MBR2GPT.exe. This tool converts a disk from Master Boot Record (MBR) to GUID Partition Table (GPT) without modifying or deleting data on the disk. The tool can even be run from inside the Windows 10 operating system.
After obtaining a test machine to work on I was able to use the tool to quickly convert the disk to GPT. After the conversion, all you need to do is reboot the workstation into the BIOS and switch the boot to UEFI. This proved to be the solution as the Bitlocker Recovery key prompt stopped showing up, and the TPM was fully functional in the TPM administration console. Below is a step by step guide on using the tool to convert a disk from MBR to GPT and making the necessary BIOS changes. Please keep in mind that it is only available in the 1703 build of Windows 10.
First, open the diskpart utility in an elevated command prompt. This utility lists the different hard drives connected to the workstation and lists their disk numbers, which are needed for the conversion process. After typing in diskpart, type in list disk and press enter. The output should look like the following:
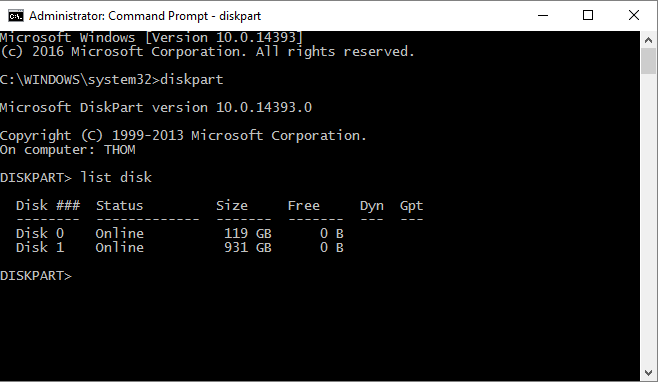
If there are two disks, be sure to note the disk number for the drive that contains the operating system (typically the C: drive)
After you take note of the disk number type in exit to leave the diskpart utility. This should bring you back to c:\windows\system32
From here type in the following (for this example I am assuming that disk 0 is the OS drive; change accordingly if needed):
mbr2gpt /validate /disk:0 /allowfullos
This command validates that the disk in question (disk 0) can be converted. The output should look similar to the following screenshot:

Once validation completes we can move onto conversion. The command for this is as follows:
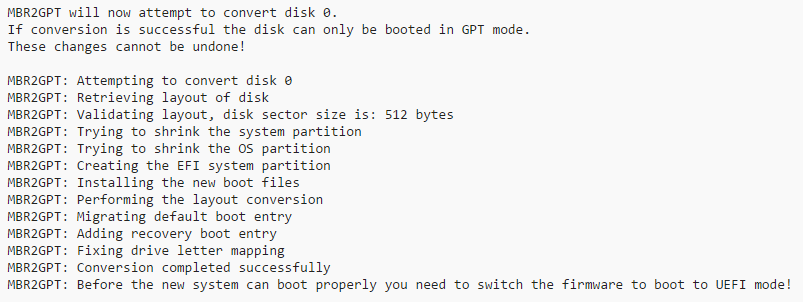
mbr2gpt /convert /disk:0 /allowfullos
This command converts the disk in question (disk 0) to a GPT disk, which is used in UEFI. The output should look similar to the following:
Once this is done we are ready to move onto the next step, which is to reboot the system and open the BIOS before the workstation reaches the Dell screen. This can be achieved by pressing F2 once the computer begins booting up.
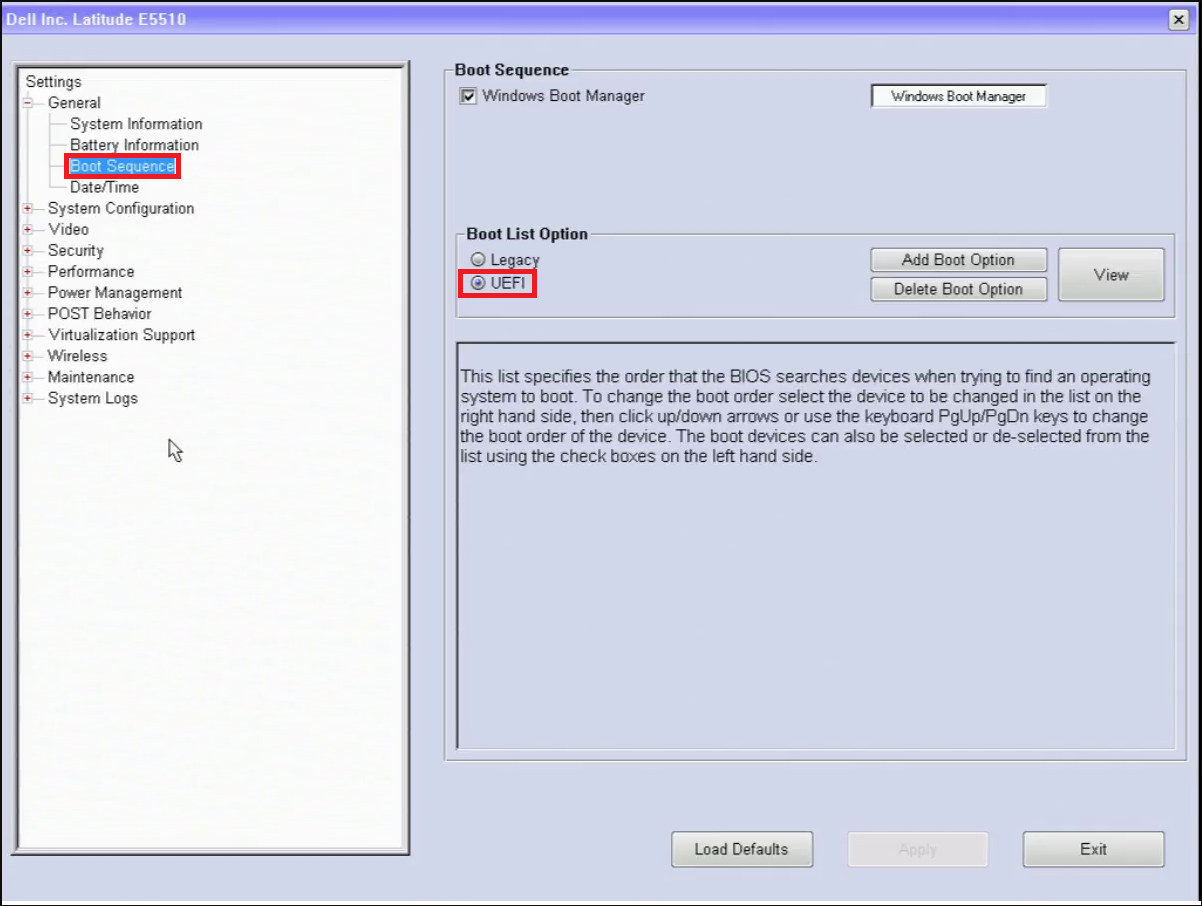
Once in the BIOS, please navigate to the Boot Sequence section under General. On the right hand side should be a section called Boot List Option with two options, Legacy and UEFI. On effected workstations, Legacy should be the checked option. We want to change this to UEFI.
If you are still having issues re-encrypting the drive after this there may be one final step to take. Open the file explorer and browse to the following location:
C:\Windows\System32\Recovery
Find a file called ReAgent.xml
Right click this file, press Rename and append .old to the file.
After this Enabling Bitlocker on the C: drive should work and encryption should begin.