How to Get Azure Multi-Factor Authentication
Azure Active Directory is included in Office 365 Azure Active Directory Premium plans and in Enterprise Mobility and Security plans. If your firm has neither of these, you can purchase MFA licenses. For more information on obtaining Azure MFA, check out this article.
Below is a guide to implementing Azure Multi-Factor Authentication.
Configuring MFA Policies
The first thing you may want to do, before enabling Multi-Factor Authentication for any users, is to consider configuring some of the available settings. One of the most important features is a trusted IPs list. This will allow you to whitelist a range of IPs for your network. This way, when users are in the office, they will not get prompted with MFA, and when they take their devices elsewhere, they will. Here’s how to do it:
- Log in to your Azure Portal.
- Navigate to Azure AD > Conditional Access > Named locations.
- From the top toolbar select Configure MFA trusted IPs. This will launch a new window.
- From here, there are two options:
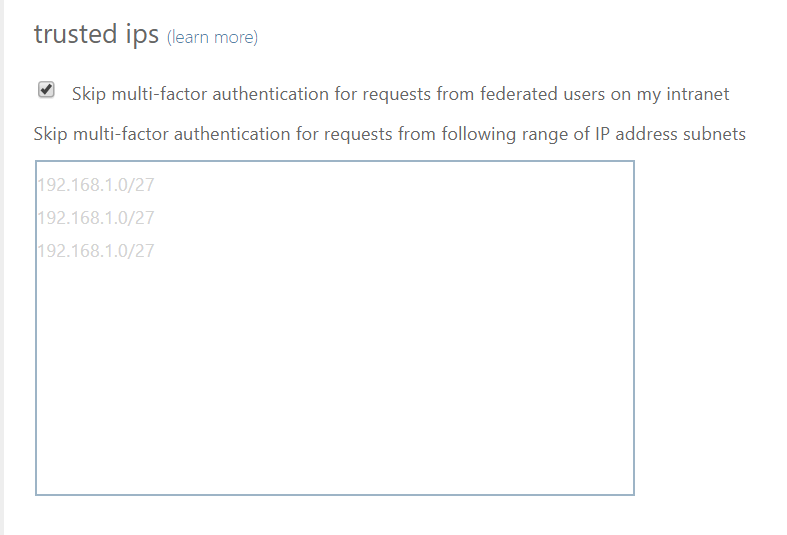
- The simpler way is to add a range of IP addresses in CIDR notation to the text box. You can then configure the verification options you want to allow, and save. Any users with MFA enforced will not be prompted when they are within that range of IPs.
- If you have deployed AD FS in your firm, then you probably want to select the checkbox to “Skip multi-factor authentication for requests from federated users on the intranet.” You will need to add a rule to AD FS to add the intranet claim. This should have the same results as option “1.”
Enabling MFA for users
Now that you have trusted IPs configured, here’s how you can turn MFA on for the users in your organization:
- Log in to your Azure Portal
- Navigate to Azure Active Directory > Users > All Users
- From the top toolbar select Multi-Factor Authentication. The MFA portal will launch in a new window.
- From the MFA portal, you will see all the users in your organization. Select the user(s) you would like to enable. You can also utilize a .CSV file to do a bulk update.
- Under “Quick Steps,” select “enable.”
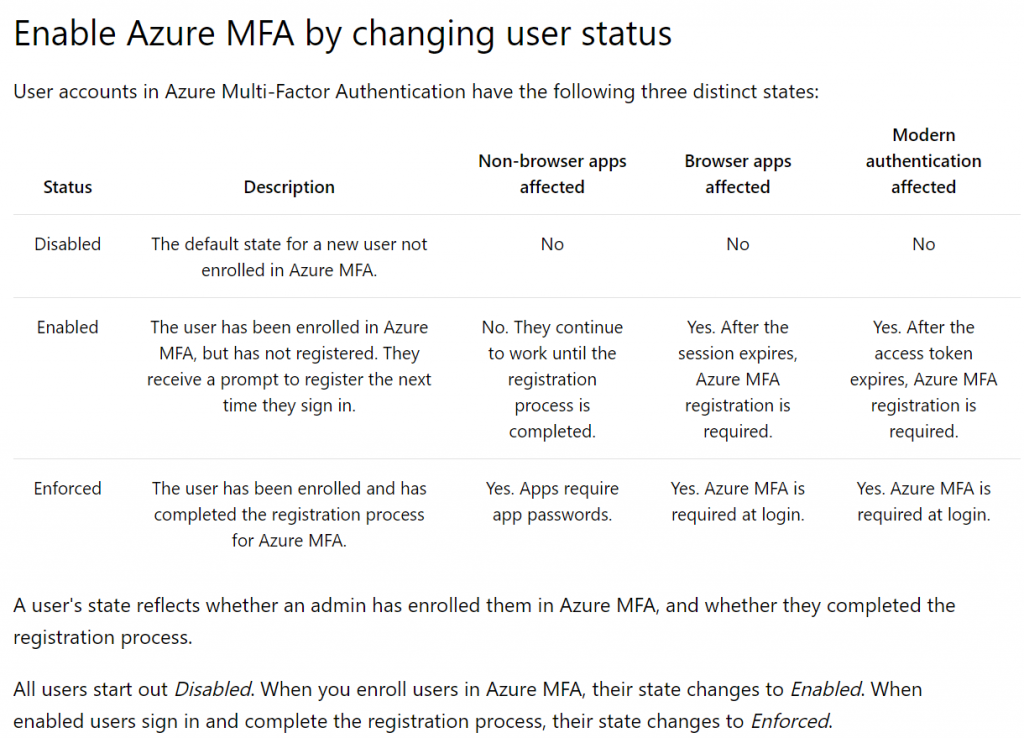
- Once a user is enabled, they will be prompted to complete their MFA registration next time they sign in through a browser. If the user does not regularly sign in through a browser, you may want to consider sending them the link provided https://aka.ms/MFASetup and ask them to complete registration. When registration is complete, the user state will automatically update from enabled to enforced. Here is the chart from Microsoft:
How user registration works
The last point I will raise to your attention, is the user-side registration process of MFA. Depending on your organizations needs, you may want to create a quick tutorial or even training session to show users what they will need to know. The registration process will require the user to configure the following:
- When users signs into a browser (or open the link you provide, as discussed earlier) they will be notified that they are required to configure security verification:

- They will then be asked to configure and verify a phone number for authentication.
- Users will have the option to configure a number of verification phone numbers, as well as the Authenticator app. To configure the Authenticator app:
- Users will be asked to download the Microsoft Authenticator app on their Windows Phone, Android, or iOS device.
- Once the app is downloaded, they can launch it, select “work or school account” and then scan the bar code presented to them in the MFA configuration browser.
- Lastly, users can select what their default verification method is.
- Call authentication phone – when prompted with MFA, the authentication phone number will automatically be called. Users will need to answer and select # to verify.
- Call office phone – same as above.
- Notify me through app – this will send a push notification to the Microsoft Authenticator app on users’ mobile phones. Users accept the push notification to verify.
- Use verification code from app – this will prompt the user to enter a verification PIN. The user will need to launch the Microsoft Authenticator app and enter the PIN that is presented to them. The PIN expires after 30 seconds, and a new one will be regenerated.
Now that you have implemented Azure MFA into your firm, you can feel assured that you are actively taking measures to secure your company’s data and alleviate excess risk to the organization.