We recently received a request to configure Exchange Online Kiosk Mode to limit firm email access to OWA for specific users and groups. Specifically, the aim was the preventing the download of attachments within OWA.
The goal of the process was to ensure the mailbox owner could not save content from the mailbox using a non-firm-owned device. In essence, the task was to create a kiosk mode for email access. With a combination of Azure conditional access and OWA mailbox policies, this was easily achieved. We’re sharing the steps here.
Part 1: Conditional Access Policy:
As a starting point, you’ll need to set up a conditional access policy that restricts Outlook access to firm-owned devices. To do that, perform the following steps:
1. Log in to the Microsoft Azure Admin Portal: https://portal.azure.com
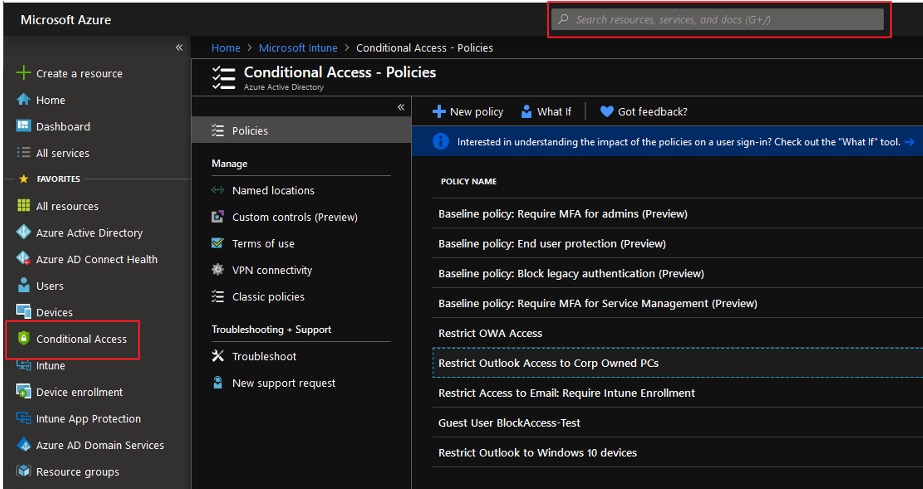
2. Click Conditional Access. If Conditional Access does not show up after login, type Conditional Access in the search bar at the top center of the screen. The screenshot below shows the existing policies.
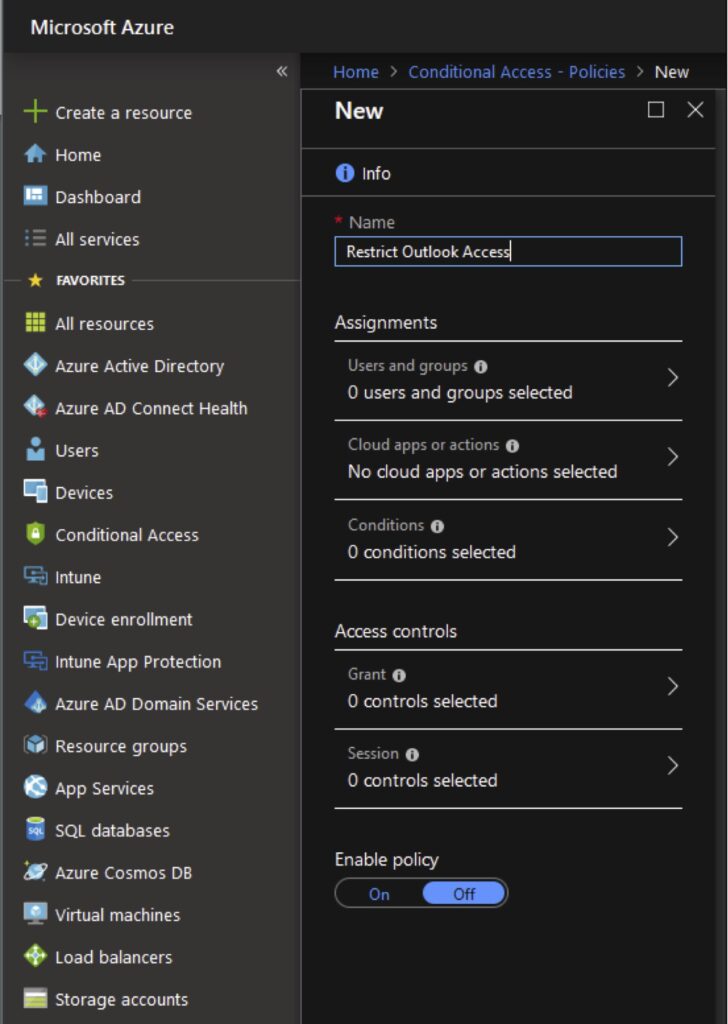
3. Create a new policy: Click New policy and enter any descriptive name such as Restrict Outlook Access. Note: The policy is disabled by default, be sure to enable it.
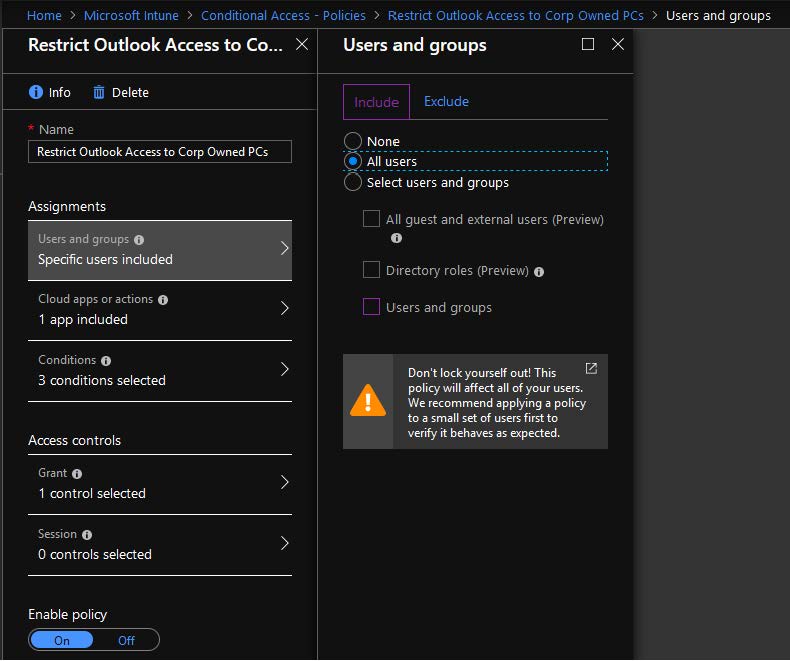
4. Next, click Users and groups under Assignments to assign users to the policy. In the Users and Groups blade, select the user(s)/group the policy should apply to. Note – be sure to test the policy with pilot users or groups first rather than adding all users. The policy can cut off Outlook access for all users if it is not configured correctly.
5. Click the Select users and groups radio button.
6. Click the Users and groups check box.
7. Select the users/groups to apply the policy to in the Select blade. When the users/groups have been selected, click the Select button and then the Done button on the Users and groups blade.
8. Select the Apps to apply the policy to: Click Cloud apps or actions.
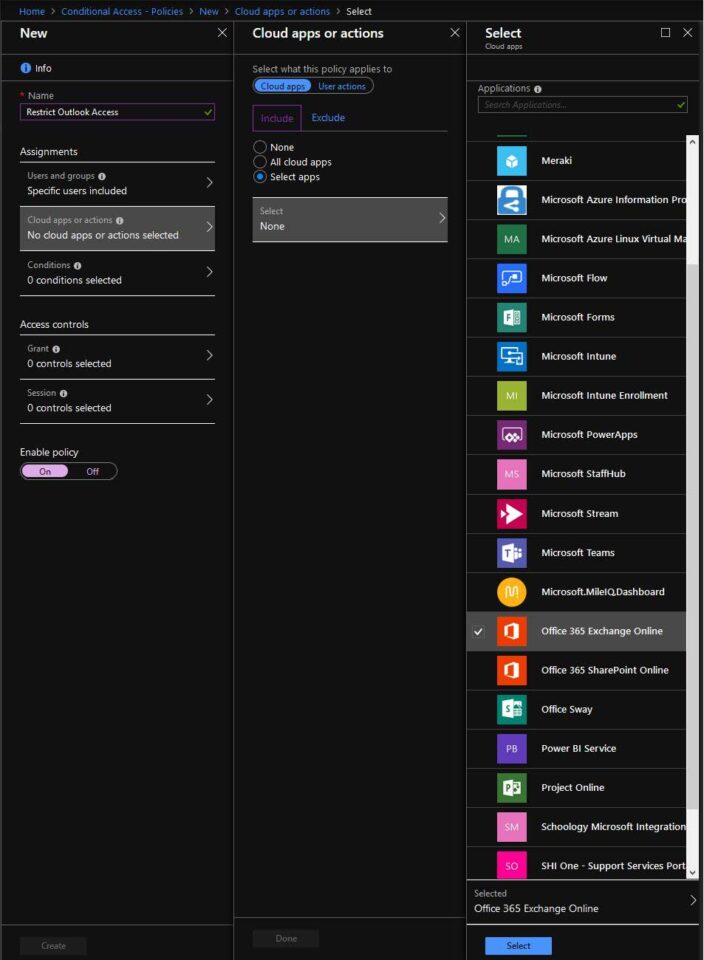
9. Click the Select apps radio button in the Cloud apps or actions blade and then click Select.
10. A new blade will appear with a list of applications to apply to the policy. Select Office 365 Exchange Online. Click the Select button at the bottom of the blade.
11. Click the Done button at the bottom of the Cloud apps or action blade.
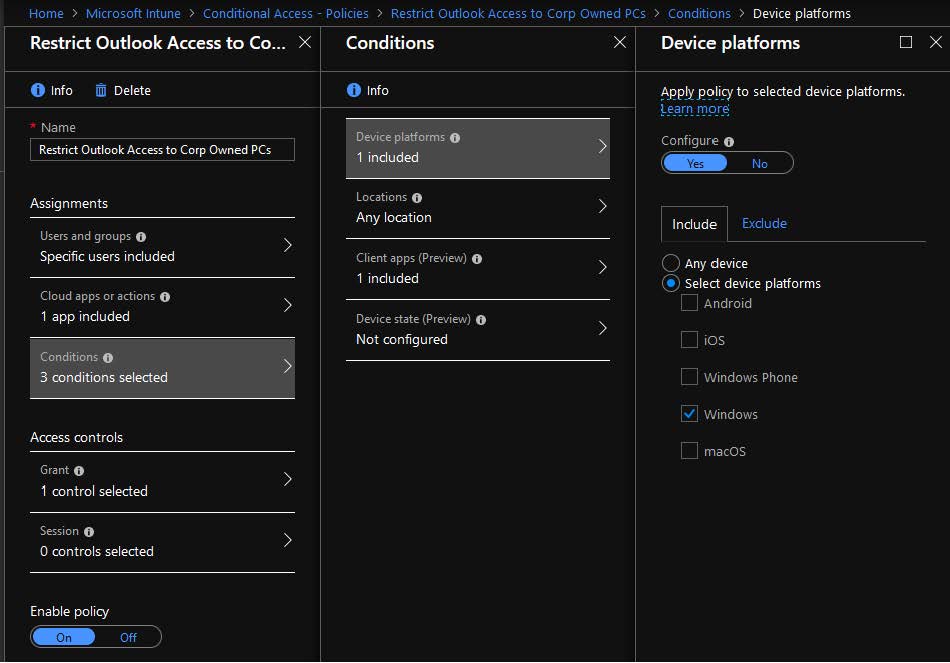
12. Select Conditions, this will present the Conditions blade.
13. Select Device platforms. On the Device Platforms blade:
- Click the Yes button on the Configure slider
- Click the Include tab
- Click the Select device platforms radio button
- Click the Windows check box
- Click the Done button to close the Device platforms blade
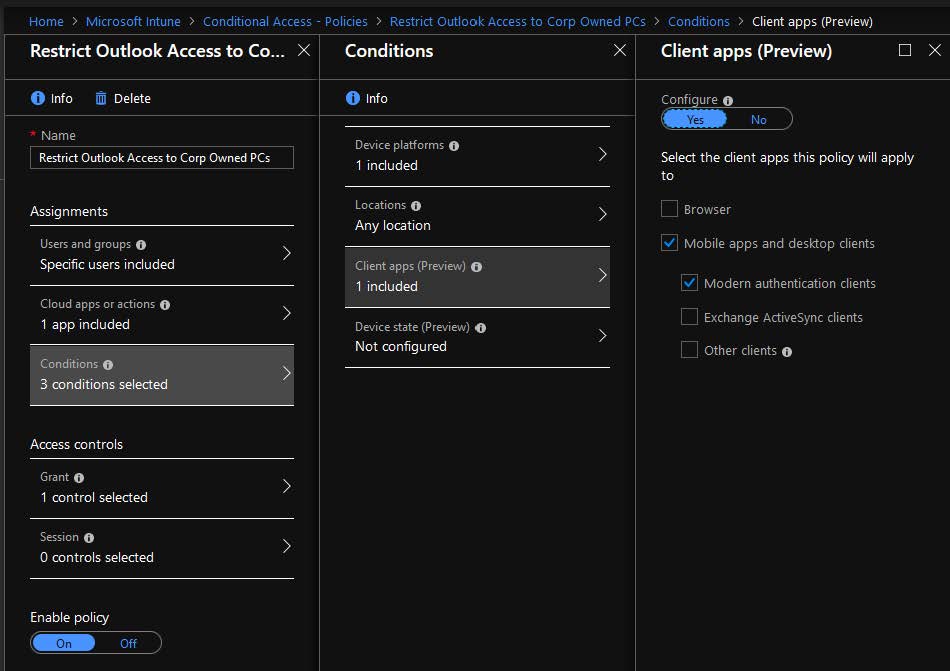
14. Click on Client apps on the Conditions blade, which opens a new blade.
- Click the Yes button on the Configure slider
- Click Modern apps and desktop clients
- Click Modern authentication clients
- Make sure no other options are selected
- Click the Done button on the Client apps blade
- Click the Done button on the Conditions blade
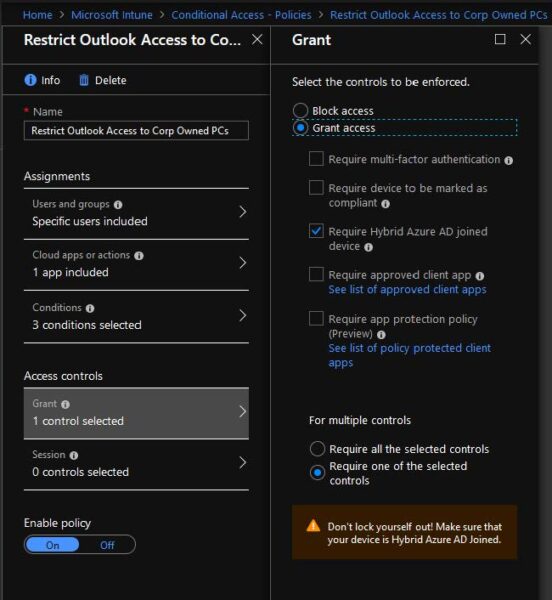
15. Select Grant (under Access Controls), which presents the Grant blade.
16. Click Grant Access.
17. Click the Require Hybrid Azure AD joined device check box.
18. Click the Require one of the selected controls radio button
19. Click the Select button to close the Grant blade.
20. To complete setting up the policy click the Create button.
Note – Use caution with this setting. Once selected, any device that needs Outlook access must be hybrid joined. As such, make sure PCs that require Outlook access have been hybrid joined. You can limit the scope of the policy by assigning it to specific users/groups as described above. If you are ready to test the policy, make sure to enable it by selecting On under the Enable policy slider. Remember that this policy requires PCs to be Hybrid Azure AD joined. All other PCs will be denied access.
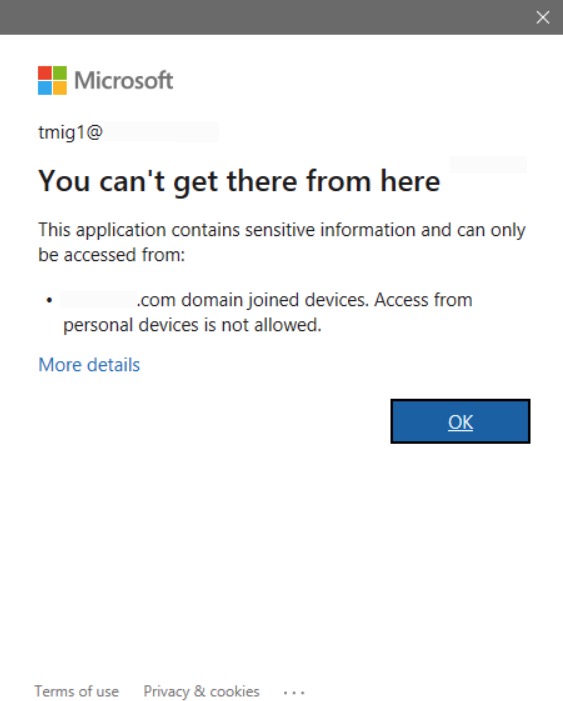
Once the Conditional Access policy is configured and enabled, it will prevent users from connecting to Exchange Online. When a user attempts to create an Outlook profile to connect to their mailbox, they will be denied access when configuring the MAPI profile. If a profile has already been created (before the policy was put in place), the user will also be denied access. In both cases, after a user is prompted for credentials to connect to EOL, the following message will be displayed.
Part 2: OWA Mailbox Policy
The conditional access policy created in Part 1 limits the user or group in question to OWA only. The OWA mailbox policy controls access to features within Outlook Web Access, namely the ability to download attachments. To setup an OWA mailbox policy, perform the following steps:
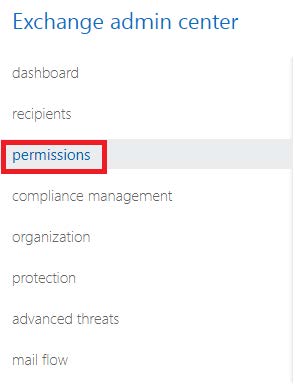
1. Login to the Exchange Admin center and click permissions as shown below:
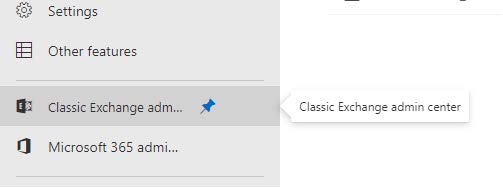
If the view does not show a menu option for permissions, login to the classic Exchange Admin center and then navigate to permissions as shown above:
2. Click the “+” icon to create a new policy:
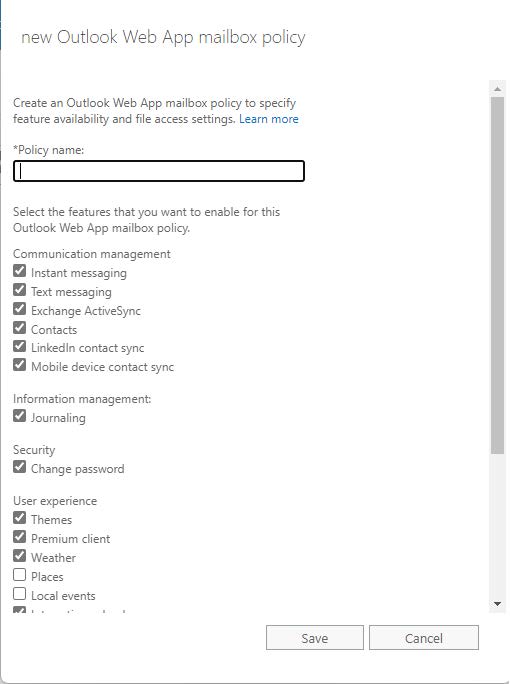
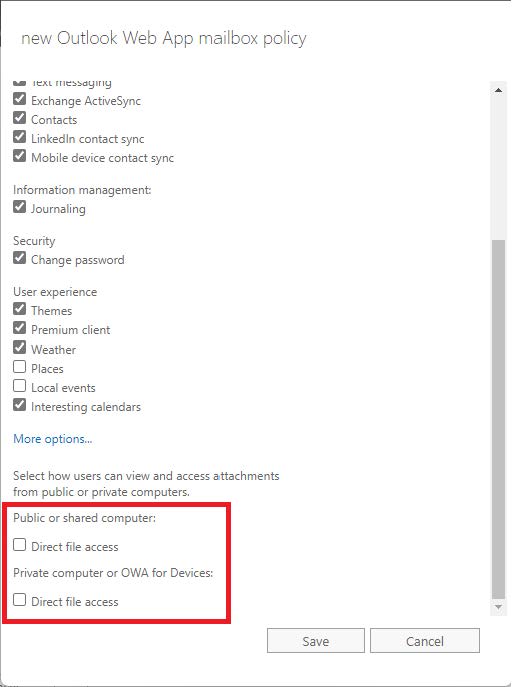
3. In the new Outlook Web App mailbox policy screen, enter a Policy name and scroll to the bottom. (deselect any relevant features here as needed) Deselect the Direct file access options at the bottom as shown below:
Click Save when completed.
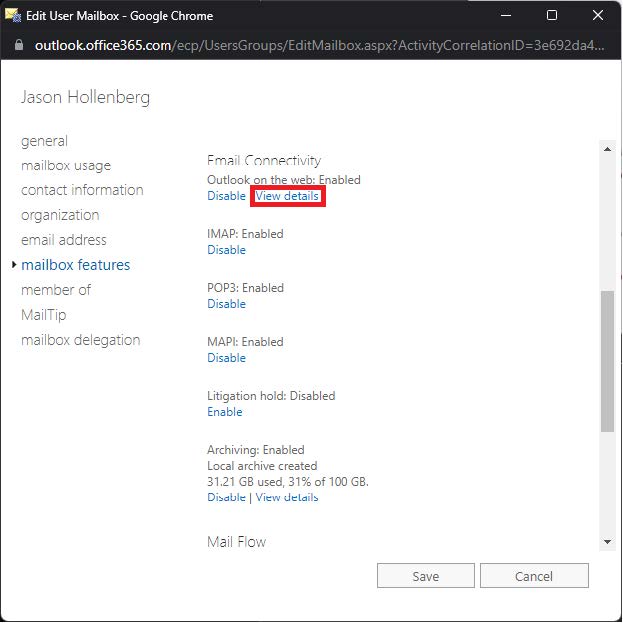
4. Under the recipients | mailboxes panel, search for and open the mailbox where the policy should apply. Click the mailbox features tab and click View details under Email Connectivity:
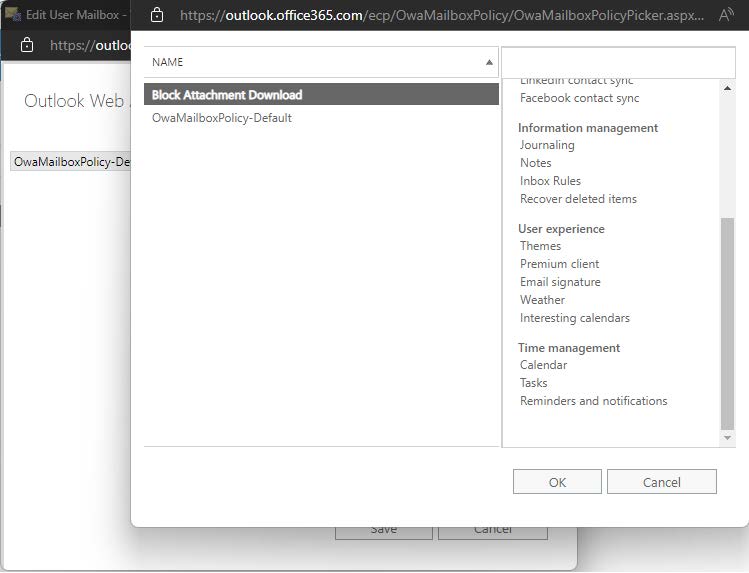
5. Click Browse and choose the newly-created OWA mailbox policy. Click OK when finished:
6.Save changes and exit – the OWA mailbox policy is now applied to the mailbox.
At this point, the mailbox owner is now restricted to OWA only on a non-firm-owned device, and cannot download attachments from OWA. The mailbox owner can only read emails but cannot save content to the device.
For assistance from the Kraft Kennedy team, please contact us.
