With the recent release of ndOffice 2.4, NetDocuments has now provided attorneys and legal professionals with a feature that has been wanted for a long time — the ability to automatically set some profile attribute values when saving new documents from Microsoft Office applications. The most common use case for this will be firms who assign an “Author” to each document. For those unfamiliar, the “Author” of a document doesn’t necessarily need to be the person who created the document, or actually typed it up. But rather, the Author can be set to who’s signature is at the bottom of the letter, or which attorney is ultimately responsible for the language contained in the document. This field has a long history in DMS Products, and is typically a required field for products such as Worldox, iManage, and OpenText DM. However, out-of-the-box, the Author field does not exist in NetDocuments. NetDocuments, by default, keeps track of who technically created the document, and who was the last to modify. Thus, many firms added an additional custom Author attribute so they can keep track of documents for their attorneys, regardless if they actually typed them up or not.
Until now, if Author was a required field in NetDocuments, users had to select an Author value each time they saved a document. That can be cumbersome. With ndOffice 2.4, a user can create a Profile Template and have that apply automatically. But the way to get it to work can be a bit tricky. Once you are running ndOffice 2.4, here’s how it’s done:
1.Log in to your NetDocuments web interface, and go to your list of Recent Documents.
2. Highlight/select (but don’t open!) any document, and in the Power Bar, click on Edit Profile.
3. In the Edit Profile screen, click on “Clear Profile”.
4. Now edit the profile with what you want to be your default. For example, choose yourself as the Author.
5. Click on “Save as Template”, and give the template a name such as “Default Author”, and hit OK.
6. Back on the Edit Profile screen, hit Cancel (so you don’t actually change the profile of your recent document).
7. Next, click on “Hi (Your Name Here)” in the upper right, and then choose Settings from the dropdown menu.
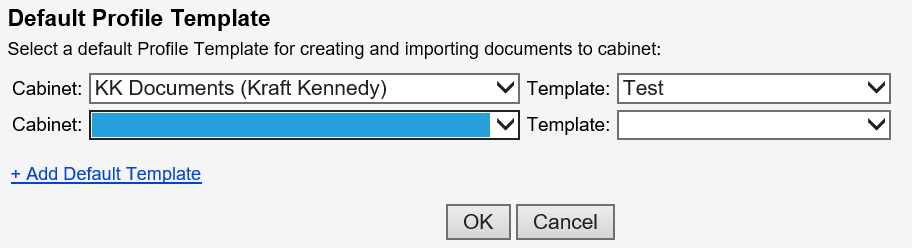
8. Click on Application Settings
9. In the Application Settings window, scroll down to the bottom, and select your cabinet and your saved profile template.
10. Hit OK to save your changes, and then Close out of the Setting dialog.
Whew, they don’t make it easy.
Once those steps are down, the next time you save a document from Word, your profile will be pre-populated with with your template values. You may want to log off and log on again just to be safe.
A couple of other notes about setting profile defaults. First, this is a per cabinet setting. So, if you have access to multiple cabinets, you’d need to create a profile template in each one, and assign it appropriately in the Settings area. Second, default values should NOT be set for Client and Matter attributes. Stick to those additional attributes like Doc Type, Author, or any other optional field.