In the first part of this series, we discussed what SCCM Desired Configuration Management is and why you might want to use it. Using the example of creating a security baseline for monitoring configuration drift on corporate laptops, we began setting up the initial framework. Now it’s time to get to the business end of our DCM baseline: creating the actual compliance items we want to track and validate in our organization’s population of laptops.
DCM: initial steps
To keep things neatly organized, we’ll create a series of folders to hold our work. A lot of our DCM efforts involve security, so we’ll create a top-level folder for that in both Baselines and Configuration Items. The ones we write ourselves we’ll put under a folder with our company name (“Kraft & Kennedy”). Microsoft and the US government also have useful compliance offerings we can download for free (we’ll cover these in a future blog post), so let’s create folders for them as well.
![clip_image002[6]](/wp-content/uploads/images/clip_image0026_thumb2.jpg)
Configuration Items
Before we can create baselines, we need to create Configuration Items, or CIs for short. For our example we’ll create three CIs. The CIs we’ll develop here showcase a variety of DCM’s rich monitoring capabilities.
The first CI we’ll create will cover two of issues mentioned earlier: P2P and the hosts file. CIs can hold one or multiple criteria — in this case, both CIs are related to name service security so I’ve decided to group them together.
For P2P, here’s the game plan: we’re going to check the value of a registry key associated with the following service and make sure it’s set to disabled:
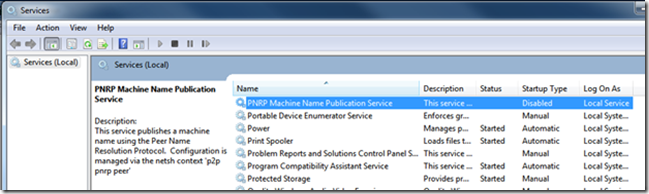
PNRP is a protocol that’s used for publishing a PC’s name into a P2P cloud. This capability has its uses, but in a business environment it arguably poses unwanted risks (remember our dictum about poorly managed change?).
Next, we’ll verify that C:WindowsSystem32driversetchosts, a file that can short-circuit DNS lookups but can be useful under certain circumstances, has a known “good” checksum. Now that we’ve got our plan, here’s how to implement it.
We’ll start under Configuration Items > Security Config Items > Kraft & Kennedy. Right-click and choose New > General Configuration Item. The first screen asks for basic descriptive information:

The Categories setting is useful but not required (“Security” would be a logical choice). Click Next, then Next again. In the Settings dialog, click New > Registry and fill in the dialog as follows:
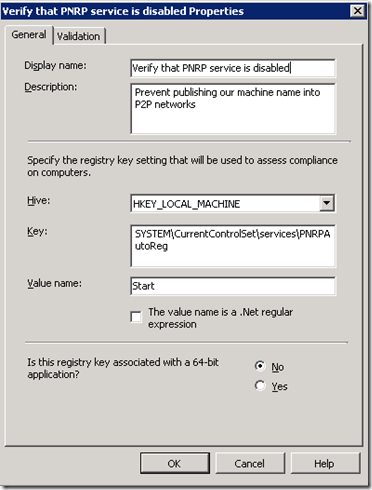
Click the Validation tab. In our case, the registry value we’re checking is of type DWORD, so we’ll need to change the Type. There’s a Severity level which can be used to make an entry in the local PC’s Windows Event Log if desired – in this case, we won’t bother and will simply report non-compliance events up to our central SCCM server. (Depending on the sensitivity of the compliance question, you may or may not be concerned about end users being able to view results in the local event log).
Click New to configure validation and set the value to 4. In case you’ve lost sight of the forest for the trees, we’re simply telling DCM that the registry value HKLMSYSTEMCurrentControlSetservicesPNRPAutoRegStart should be 4 (disabled) or be considered out-of-compliance.
![clip_image002[8]](/wp-content/uploads/images/clip_image0028_thumb5.jpg)
Click OK twice until you’re back at the Settings screen.
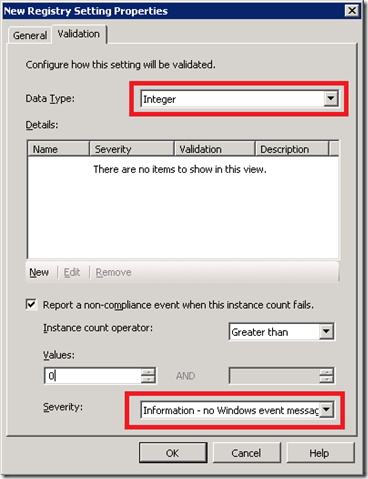
I wanted to show you a simple validation technique first that just checks a registry value. The next technique we’ll touch on is slightly more involved, but not difficult: we’ll use a SHA-1 checksum of the file c:windowssystem32driversetchosts as our second CI validation item. To utilize SHA-1 checksums, we need to go back to the Objects section, so click on that in the navigation pane of the dialog. Fill in the dialog as follows:
![clip_image004[6]](/wp-content/uploads/images/clip_image0046_thumb4.jpg)
Click on the Validation tab, then New > SHA-1 Hash. To obtain the hash, you’ll need a utility that calculates SHA-1 checksums for files – fortunately Microsoft has a free download called the File Checksum Verifier Utility. Run fciv.exe from the command line on your reference PC to obtain the desired checksum:
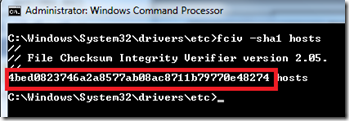
Cut and paste the checksum into the Validation dialog:
![clip_image002[10]](/wp-content/uploads/images/clip_image00210_thumb3.jpg)
Click OK and then click through the remaining dialogs until you arrive at the Summary screen, which should show your two validation criteria:
![clip_image004[8]](/wp-content/uploads/images/clip_image0048_thumb4.jpg)
Click Next and finish up. Congratulations, you’ve created your first Configuration Item.
In the next part of this series, we’ll create Configuration Items based on programmatic queries. While DCM’s built-in querying and validation capabilities are excellent, custom scripting allows you to drill down into the most obscure corners of your computing systems. Stay tuned.